
Okay, I promised to deliver the goods in this article. If you are coming here from YT, then you can skip the video at the end of this post. This is going to be a quick and pretty tutorial on how to grade your super 8 footage. You’ll need a non-linear editing system and some super 8 footage fresh from a professional scanner.
Why this method works for super 8 film?
When celluloid film is manufactured, it has dye layers which stain silver halide crystals on a plastic strip of emulsion.
In color film, these dye layers act in very predictable ways (well the Kodak stock does). How this reaction is measured is called sensitometry. It allows filmmakers to get an idea of how much latitude is in their film stock (the difference E.I. Ratings of film contribute to these results).
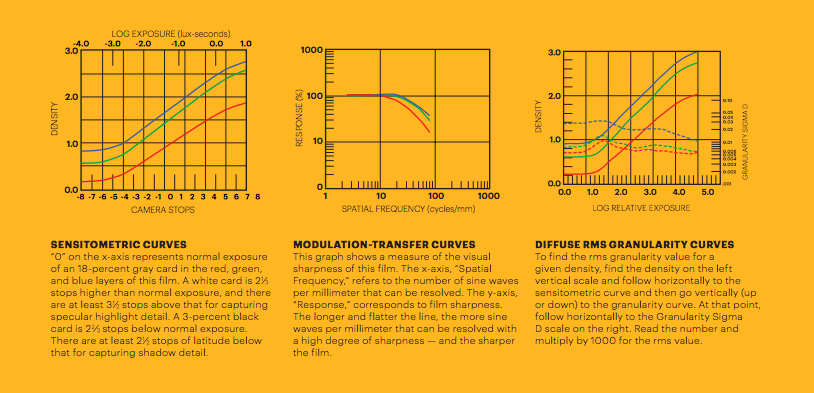
Once you understands these basic principles color grading film is a sinch;
- Silver halide crystals capture the “light and dark” areas of your scene (which reproduces detail).
- Three essential dye layers capture color on film (cyan, magenta, and yellow).
- And noise (unexposed silver) appears when you run out of light in the tails of your sensitometric curve.
With this simple color correcting key we can began to understand how to bring the most out of the super 8 format with our NLE system.
Let’s grade the footage!
Step one in the process has everything to do with this idea:
Every analog image is a black and white image, until you add the dye.
The initial action will always be to desaturate the image. By doing this, you have an opportunity to see what was captured on the film stock (and what was developed by the lab).
This stage allows you to make gamma adjust at the most elementary level. There no need for LUTs.
Now the second part of this grade is where you get to see the super 8 format shine.
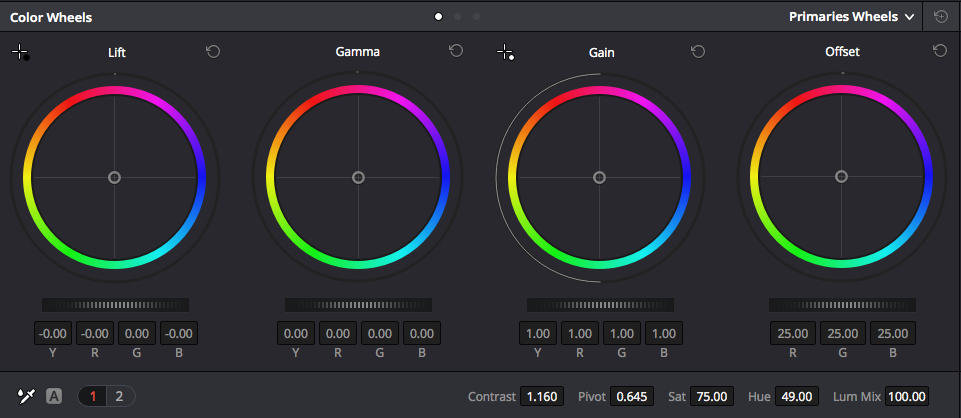
Go for the color.
The secret is to add saturation on a linear curve. You don’t want a logarithmic or s-curve. The dye layers happen in washes.
Yes the highlights and shadows of the individual sensitometric curve do fall off on an s-curve. But, in the first step you already set the master curve. Adding additional curves would be overkill. This is why I suggest you add the saturation back in linearly.
Respectively, you should balance the footage for neutral gray using a linear grade too. Furthermore, to make sure you aren’t making luminosity (black and white point) adjustments, restrict the grade using a blending mode. It works wonders. (This process inherently allows you to color balance your footage, so you are good. If things are too warm, cool, green or red, you will fix that in this step.)
Sand isn’t just for beaches! We need the precious grain in our super 8 footage, baby.
Now, this is the last step in the fast super 8 color grade. And quite frankly the easiest to make.
All you are going to do is make a VERY SMALL addition to the perceived sharpness of your footage. I call it, finding the sand, because it will look like tiny grains of sand all over your footage. That’s great thing! Because that is the silver stained emulsion your are now seeing. Ain’t it beautiful.
Completing this step also allows you to manage the grain (via noise reduction), if that’s your thing. And you can do it with complete creative control!
Simply apply your noise reduction to an adjustment layer/node and voila. Manipulate the opacity to taste. Some folks like a lot of grain others don’t. When you have control over it, it truly becomes an artistic and creative decision. But without that grain, you are losing most of your edge detail, and that is a travesty.
Bet you didn’t think a baseline grade was so fast and simple on Super 8 footage.
Now that you have this starting-off point, you can begin adding your creative cinema grade. You know the blue and teal look, and all the other many flavors in between. I hope this helps, here is the YT video that spawned this article. Watch below.